
 When I did a Hohlenpoker demo at this Spring's NGPP Workshop I can honestly say that people were wowed. Some had never heard of it. Some had heard of it but admitted that they didn't quite get the H-poker concept, i.e.:
1. It invisibly perforates or "microvents" new sheet vinyl which need to be made breathable for so many reasons... like dead walls, wallpapered water-warped Luann doors, forced drying over wood paneling, and generally forcing dry times for reasons too numerous to mention with tiny holes generally invisible to the naked eye with almost every type of wallcovering.
2. It perforates the crap out of papers to be removed. It's really unbelievable how much better it is than the Paper Tiger.
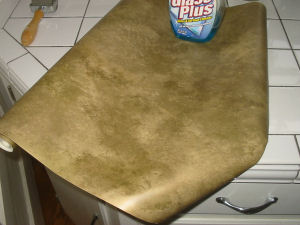 Do you see the roll of new paper-backed vinyl wallpaper to the left? There is a section that has already been hohlenpoked. Do you see the Glass Plus? I'm now going to spray the face of the wallpaper with Glass Plus and wait only ONE MINUTE for the magic of capillarity to occur. |
 |
| See the Video of the Hohlenpoker in Action |
ONE MINUTE LATER---here's the flip side of this PBV above |
And I only made a couple of passes with the Hohlenpoker. Normally a rigorous h-poking and a typical 15 minute soak time means that the entire backing is saturated. That's pretty much every square inch, folks. How much papertigering do you have to do to get that much square inch perforation? The best part is that that Hohlenpoker does not pull tufts of sheetrock facing which must later to repaired.
This is also a perfect tool for removing papers that have been varnished or painted over
If you are thinking of making one or already have made one here are some useful tips:
1. Hohlenpokers have sharp pins, don't operate when you are pregnant or drowsy. Do not leave them on chair seats.
2. When you first get the Hohlen poker in your hands... have fun. Get some scraps of different wallcovering material types and some sort of "backing board" like plywood or scrap drywall. Roll the wallcovering material a couple of times with the poker and then hold the wallpaper up to the sun or a bright light. Voilà. Tons of tiny holes. (Note--If you consider that the pin points are tapered, you can see that the deeper the point goes into the wallcovering the larger the pin holes will be. It just so happens that sheetrock facing provides the perfect "backing softness" for normal pressure. If you want to make teeny, tiny holes poke the wallcovering on a harder surface like ceramic tile or Formica®
3. Then get some PBV and do the spritz thing with water, or DIF, or Glass Plus on the pattern side. Get a feel for how many tool passes are required to get complete square inch saturation of removal solution to the paperbacking. Remember you don't have to press that hard on drywall -- it's the capillary action that is doing the real work anyway.
4. For hohlenpoking of NEW wallpaper always TEST beforehand. It is a rare case where the holes are visible...but it can happen. New materials to watch out for are all-white or off-white hi gloss vinyl sheets without any embossing. But that doesn't mean that you can't poke them, it means you can't poke them on the soft backing of drywall. You can "pre-poke" the sheets with teensier holes on a hard backing as described above.
5. Whenever you poke new material always make sure the customer is out of the room for obvious reasons. Even though the holes aren't visible and many times poking can only improve the installation, it will bother many people to know that you have poked their $40 s/r material. If you have one of those old retired guys who hangs around all day, keep pointing to the window and saying, "What was that?" as you quickly poke the stuff with his back turned.
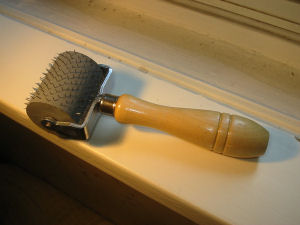
Materials to Make a Hohlenpoker:
One Embee E54D 2" rubber roller. This tool is now being distributed by Marshalltown Tools (1-800-987-6935). You have to call them for a local dealer since their website doesn't handle e-commerce. Here is one I found on Amazon http://www.amazon.com/Solid-Rubber-Seam-Roller-E54d/dp/B000I1EFKM
1 box stainless steel dress pins
1 pair Needle nose pliers (with wire cutter ridge, preferably)
Cut the head off a dress pin and jam it, butt end, into the rubber roller with the pliers. Spin the roller to make sure it clears the yoke. Repeat until you have a row across the roller---about ten pins. Repeat endlessly until you have something that looks like the picture at the top of this page. Oh.......did I mention band-aids in the material list?
Check out the video: